Did you know that Microsoft has a staggering 1.2 billion Microsoft Office users worldwide? These users include millions of professionals who rely on Microsoft Office software every day and use only a fraction of its capability.
As proposal professionals, we know that compliance is king, but did you know that MS Office has tools to help you work smarter AND achieve compliance?
Here are 9 tips and tricks to help you harness the functionality of the tools you’re already using, work smarter, and better protect yourself against proposal compliance issues.
Keeping Graphics Compliant
One major component of compliance that is often treated as an afterthought is graphics.
When working to ensure your graphics are compliant, you must first make the graphic compliant to begin with. That means you shouldn’t take an old graphic or a graphic of unknown origin and try to stick it into your proposal without verifying it meets the requirements of the new solicitation. If you’re working with a good graphic artist, this part is easy.
1. Make the graphic compliant to begin with.
- Tell the graphic artist the requirements for the proposal (font type, size, spacing, margins, etc.)
- Good proposal graphic designers will know how to set their artboard to fit in your document.
- Example: An 8.5 x 11 inch sheet with 1-inch margins, a full-width graphic will be 6.5 inches wide.
Graphic Artists can use graphics software, such as Adobe Illustrator to set the artboard to the correct size, so you know that it will fit into the document without changing font size.
Do not use software like PowerPoint to create proposal graphics. They have issues with scaling incorrectly when they’re added to a final document.
2. Keep the graphic at the right size in the document.
When you insert the graphic, make sure it is set to 100%. This ensures that your font doesn't change from how your artist designed it. Follow these steps:
- Right Click Image
- Size and Position
- Scale
- Make sure height and width are 100%
Make sure the graphic set to scale to 100%, and don’t adjust it downward. I understand the temptation to resize a graphic to make it fit better on the page, or get yourself back in page count if you’re over, but that’s a risky game.
Sizing down the graphic yourself is a common mistake that leads people to have graphic elements that are non-compliant. Instead, you’re better off working with your graphic artist to find other ways to trim graphic size while ensuring that your font doesn’t change.
3. Double-check graphics that you’re not sure about.
The final tip is to double-check any graphics that you’re not sure about. If you want to double-check a graphic, one quick way is to use the text box tool in Microsoft Word. You can type the same text as the graphic, making sure you set the font to the same size and type required by the solicitation.
By overlaying the textbox over your graphic, you can assess whether the graphic is smaller than the text box, thereby determining if it is font size compliant.
Don’t shrink graphics on your own—you risk non-compliance on the font size!
How to Keep Everything Inside the Margins
Once you’ve gotten your graphics compliant according to font size, it’s important to keep everything inside the margins. For full width graphics, as long as the artboard is set to the correct width, you can center these graphics and you’ll be right up to the margins. For smaller graphics, there are several ways to position them on the page.
For beginners, the easiest way to make sure you stay within the margins is to use the built-in tool.
- Click the graphic
- Click the “Picture Tools: Format” tab in the “Arrange” group
- Click the drop down for “Position”

Once you click the picture, you click a tab in your ribbon labeled “Picture Tools: Format”. Within that tab, there’s a drop down button labeled “Position” that gives preset locations on the page. For example, it will let you snap the graphic to the top left corner of the page, or the bottom right corner, and you won’t have to worry about the graphic jumping to the next page or popping into the margins if you make edits to the text around it.
For full-width tables, I frequently see people having their tables spill out into the margins, or actually be undersized for the margins. Both are an issue: for tables that are too wide, you risk non-compliance.
For tables that are effectively full width but fall just short of meeting the margins, you’re wasting precious space, which can be a game changer on proposals with tight page count restrictions.
Follow the same rules for making a graphic full width by setting your tables to the correct size. For most proposals, this will be 6.5 inches wide, but make sure to check the page and margin requirements on your given solicitation.
The final step for margins is to double-check using the gridlines tool in Word. For those of you who are unfamiliar with this tool, it overlays a grid onto the page inside the margins, leaving the margins white around the edge.
How to Double-check Using Gridlines in Microsoft Word.
- Click the View Tab
- In the “Show” group, click the box next to “Gridlines”

To often I see many people try to eyeball whether a graphic looks like it’s lining up with the text on a page to determine if it’s in the margins, but the only way to know for sure is to turn on gridlines.
As long as the graphic stays within the grid and doesn’t poke out into the white space, you’re safe.
Beyond Graphics: Other Tips and Tricks
Beyond graphics, the one takeaway I try to pass on to anyone I work with in proposals is to use paste special to keep text only.
Many people like to use control + v to paste, but in Word, the default paste usually brings over formatting from whatever source you’ve copied. This can create issues with the styles in your document, and risk bringing in non-compliant fonts.
I’ve seen issues where people have inadvertently pasted in fonts that were just a bit smaller than what’s allowed—say, Times New Roman 11 instead of 12. With the naked eye, it can be difficult to spot the difference when it appears mid-paragraph in a text-heavy document.
Sometimes people paste in text that is the correct font size, but that has been compressed to reduce the spaces between characters and between words. This is extremely hard to catch when you’re scrolling through the documents. I’ve read GAO reports where they’ve taken away an award from a company for having compressed text of the correct font size in their proposal.
That’s why it’s imperative to preserve the correct settings and not paste in other styles.
How to use paste special to avoid inadvertently bringing in non-compliant fonts to your document:
- Right Click “Paste Options”
- Click the clipboard with the letter “A”
You can set your default paste to be special (without formatting):
- Click File, Options, Advanced, Cut, Copy, and Paste
- Set all drop downs to “Keep Text Only"
I’ve read GAO reports where they’ve taken away an award from a company for having compressed text of the correct font size in their proposal. It’s imperative to preserve the correct settings and not paste in other styles.
Check for Strange Formatting by Showing Formatting Key.
Many times when reviewing content from writers who are subject matter experts, but are not proposal specialists or desktop publishing experts, you may see something strange happening with the formatting.
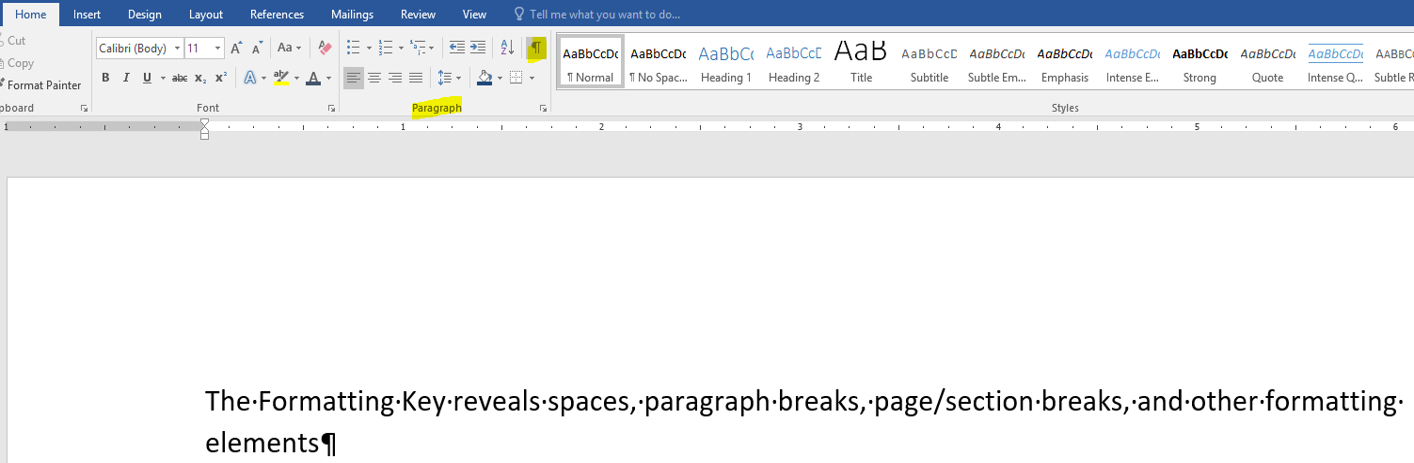
The first step to diagnosing strange issues in your formatting is to turn on the formatting key, which looks like a little pilcrow or paragraph mark. This reveals the underlying formatting, such as spaces, tabs, paragraph, and page or section breaks, as well as other formatting elements. This can frequently reveal what might be causing the strange formatting. See the example below.
Favorite Tip: Use Your Ribbon!
Perhaps my favorite Microsoft tip or trick is to make the most of your ribbon, quick access toolbar, and quick steps.
The ribbon was initially introduced in Microsoft Office 2007, and it essentially refers to the command bar across the top of any office software that holds all of the default buttons and tabs. Many people use a small fraction of the available buttons, but it’s good to familiarize yourself with the others, as they often hold really useful functionality that can make your life easier. It’s also possible to customize what commands or buttons appear on your ribbon by right clicking and selecting customize ribbon.

Your quick access toolbar is a set of buttons that stay above your ribbon regardless of what tab you’re on. The image above showing the blue bar and all the little icons, is my quick access toolbar.
You may recognize the default save, undo, and repeat buttons, but most of those others are commands that I’ve added. This is useful if you find yourself frequently having to click through tabs or search for a given command that you use a lot.
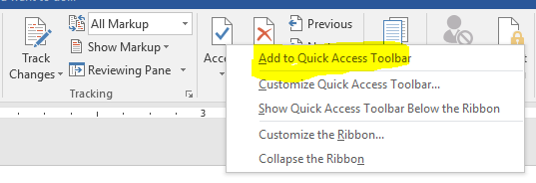
For most buttons or commands you use in Microsoft Office, you can right click these and select “add to quick access toolbar,” as shown in the graphic below.
In Word, I find it useful to keep the comment feature, page/section breaks, highlighter, and the track changes buttons available at the top of the screen at all times.
Another Powerful Tool: Use Quick Steps
When working on proposals it's important to not delete emails. However, it’s easy to become inundated by messages and have an inbox that’s too full and difficult to navigate.
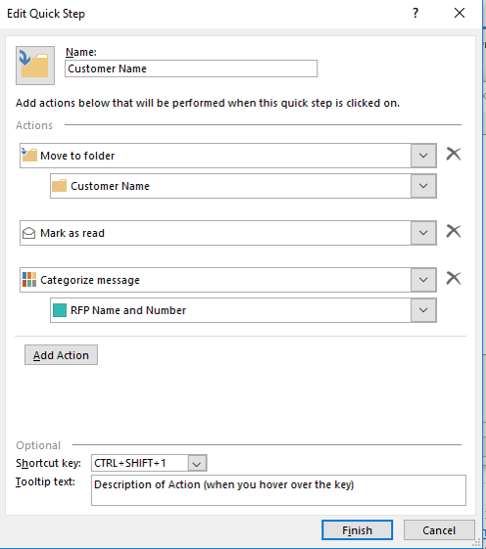
In this case the solution is quick steps. You can create a button that will perform multiple tasks for you at once.
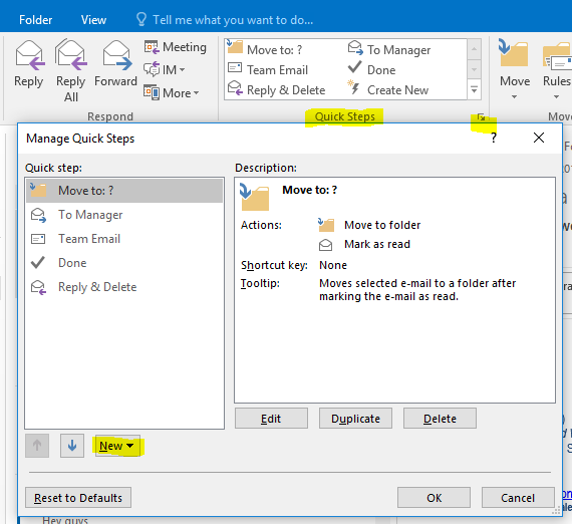
In the images below, you can see how to create a quick step that allows you to mark a message as read, move it to a selected folder, and categorize the message all with one click. This allows you to easily sort through your inbox and organize your messages for easy recall later.
An Example of how Quick Steps Saved a Proposal Effort
On one proposal effort, I was working resumes on a project where we were hiring individuals who were in the process of retiring from the military. Since their retirement was occurring so close to the solicitation date, there were extra requirements to get clearances from the military lawyer to show that there were no conflict of interest issues. Since I was supporting resumes, I was talking with these candidates frequently. At one point, the customer had a question about exactly when we had spoken to these candidates, and what was the content of our conversations.
Since I had saved all of my emails and had organized them, I was able to quickly and easily create a timeline of who I spoke to, on what day and time the conversations happened, and what we talked about.
I would also recommend the best practice of sending a follow-up email after any important call to thank the individual for their time, summarize what you discussed, and document next steps. That way, you’re not trying to remember a phone conversation weeks or months after the fact.
Final Checks Before Submission
Once you’ve incorporated these tips and tricks during your proposal development process, it’s important to remember your final checks before submission.
In some instances, the government will ask for your documents to be submitted in word as a .docx instead of as a .pdf. If you’re a proposal person, this makes your skin crawl for a variety of reasons.
Perhaps the most damaging and insidious reason is that there are changes between different versions of Word that can mean the difference between being compliant and being non-compliant. On one proposal effort several years ago where the government wanted a Word submittal, my team was working in Word 2013.
As you all may know, the government tends to lag behind in upgrading to newer versions of technology, and Microsoft Office is no different. Because of that, I had a sneaking suspicion they might be using an older version of Word. I decided to check our document on another computer that was running word 2010, and lo and behold, our document that had previously been beautifully desktop published and within page count was now several pages over, with graphics strewn all over the place.
After some investigation, I discovered that between Word 2010 and 2013, the program changed how it spaced justified text. This was late in the game, as we had thought we were almost ready to finalize the document, but now we had to do last-minute cutting to make sure we were well within page count on older versions of the software.
Since then, I’ve talked to people at other companies about other efforts where they were thrown out for non-compliance because the final pages of their proposals hadn’t been evaluated. It hadn’t occurred to them to check in other versions of the software before submitting, so they had no idea they would suddenly be out of page count when their document was opened on someone else’s computer.
You can protect yourself against this by keeping backup computers with different versions of word to check yourself toward the end of the process. I keep Word 2007 through 2016 on my home computers.
Another final tip before submission is to inspect your document and remove any unnecessary metadata.
- Use the “Inspect Document” tool to check for remaining track changes, comments, and author information.
- Click File, Inspect, Check for Issues (drop down), Inspect Document
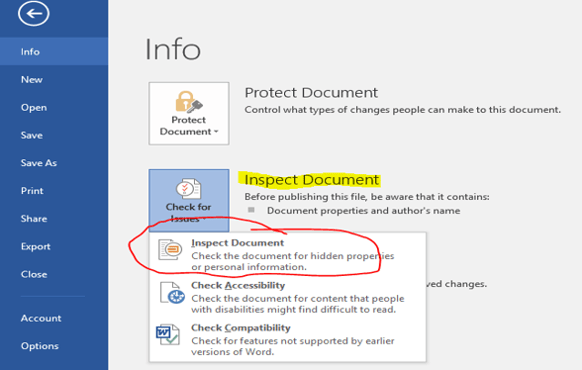
This allows you to do a final check for any track changes information, comments, and/or author information. It also has the added benefit of potentially making your file size a little smaller.
It’s important to keep in mind the government’s restrictions on file sizes if you’re submitting over email. Sometimes they will specify a limit in the solicitation, but even if they don’t, it’s a good idea to monitor your file size.
Other Favorite Tools to Help Keep Yourself Organized
Finally, here are a couple of other tools beyond the usual Microsoft Office products that are very helpful for proposals.
EvernoteThe first is Evernote. I use Evernote to keep a daily note logging what I’ve accomplished. It also integrates with chrome and outlook, so I can save important information from my email or from a website to a note for reference later.
Zapier
Another tool is Zapier. This is a powerful automation program. If you find yourself doing repetitive tasks, this can really speed things up. Zapier integrates with over 1000 other apps, including evernote. I like using it to automatically create a note for me every morning that includes the date and day of the week in the title.
TAKEAWAY
My hope is that these tips and tricks will be useful for you not only when working on proposals, but in all of your work tasks in the future. Anyone who works on a computer using any of these programs can take something from this article to work a little smarter and save time and effort, making your technology and tools work better for you.
The content in this article was written by Emily Arnold and originally appeared as part of a Proposal Strategies webinar, presented by Crowell & Moring and Key Solutions.